- 1. Step-by-Step Guide: Applying Motion Tracking to Specific Objects in a Video
- 1.1. Step 1: Choose the Right Video Editing Software
- 1.2. Step 2: Import and Prepare Your Video
- 1.3. Step 3: Locate the Object to Track
- 1.4. Step 4: Apply Motion Tracking
- 1.5. Step 5: Apply Desired Effects or Adjustments
- 1.6. Step 6: Create Keyframes
- 1.7. Step 7: Apply Desired Effects or Adjustments
- 1.8. Step 8: Fine-Tuning and Preview
- 1.9. Step 9: Test and Evaluate
- 1.10. Step 10: Render and Export
- 2. Conclusion
Source: CapCut
Motion tracking is a powerful technique used in video editing and visual effects to track the movement of objects within a video. You can add special effects, overlay graphics, or stabilize footage by applying motion tracking. In this step-by-step guide, we’ll walk you through the process of applying motion tracking to specific objects in a video.
Step-by-Step Guide: Applying Motion Tracking to Specific Objects in a Video

Source: CapCut
Motion tracking can be applied to specific objects in a video using a free online video editor that supports this feature. Here’s a step-by-step guide on how to apply motion tracking to specific objects in a video:
Step 1: Choose the Right Video Editing Software
To begin, you’ll need video editing software that supports motion tracking. Popular options include Adobe After Effects, Adobe Premiere Pro, and DaVinci Resolve. Choose the most comfortable software, or try a trial version if you’re new to video editing.
Step 2: Import and Prepare Your Video
Launch your chosen video editing software and import the video you want to work with. Create a new project and set up the project settings to match the video’s resolution and frame rate. Once imported, drag the video clip to the timeline for editing.
Step 3: Locate the Object to Track
Identify the object you want to apply motion tracking to within the video. It could be a person, a moving vehicle, or any other item of interest. Keep in mind that for successful motion tracking, the chosen object should have distinct features or markers that are easy to track throughout the video.
Step 4: Apply Motion Tracking
Now, it’s time to apply motion tracking to the selected object. The specific steps may vary slightly depending on your chosen software, but the general process is as follows:
- Select the motion tracking tool or feature in your video editing software. For example, you can find motion tracking tools in most free online video editing tools.
- Set the tracking area by drawing a bounding box around the object you want to track. Resize and position the box to include all relevant features or markers of the object.
- Initiate the tracking process. The software will analyze the selected area frame by frame, tracking the movement of the object throughout the video.
- Review the tracking results. Once the tracking process is complete, carefully inspect the tracked points to ensure accuracy. Make adjustments if necessary.
Step 5: Apply Desired Effects or Adjustments
With the motion tracking data now applied to the selected object, you can add various effects or adjustments to enhance your video. Some possibilities include the following:
- Adding graphics or text overlays that move with the tracked object.
- Applying stabilization to reduce camera shake.
- Creating virtual 3D objects that interact with the tracked motion.
- Applying color grading or other visual enhancements to the tracked area.
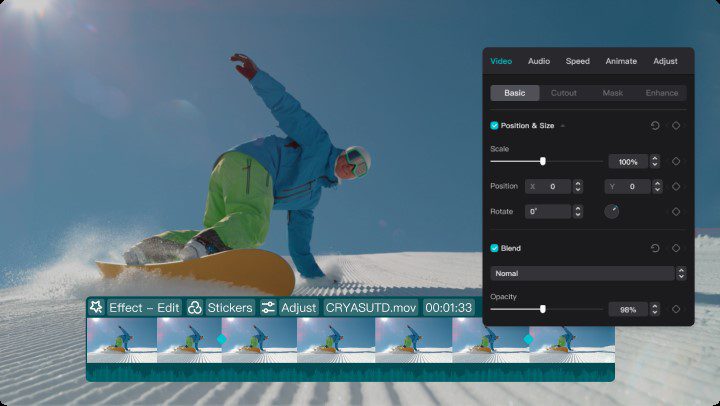
Step 6: Create Keyframes
You’ll need to create keyframes to seamlessly make the tracked object interact with the video. Keyframes are used to define the position, scale, rotation, and other properties of the tracked object at specific points in time. Setting keyframes allows you to control how the object moves and behaves throughout the video. Place keyframes strategically to match the object’s movement and make any necessary adjustments to ensure a smooth transition.
Step 7: Apply Desired Effects or Adjustments
Now that you have the motion tracking data and keyframes in place, it’s time to apply the desired effects or adjustments to the tracked object. This step involves using the available tools and features in your video editing software to enhance the appearance and behavior of the object. For example, you can apply color correction, add visual effects, or even replace the object with a different element altogether.
Step 8: Fine-Tuning and Preview
After applying the effects and adjustments, spend some time fine-tuning the details to ensure a polished result. Adjust the keyframes, timing, or any other parameters to achieve the desired visual effect. Preview the video to see how the applied motion tracking and effects look in real-time or with a rendered preview. If needed, iterate and make further refinements until you are satisfied with the outcome.
Step 9: Test and Evaluate
Before finalizing the video, testing the motion tracking and effects on different devices and platforms is important. Watch the video on various screens and resolutions to ensure that the tracking and effects remain intact and visually appealing. Evaluate the overall impact of the motion tracking and its effects on the video’s narrative or intended message.
Seek feedback from others if possible, as fresh perspectives can provide valuable insights. But before you export your video, ensure you remove any unwanted background to make your video look attractive. Use a video background remover in many free online video editing tools.
Step 10: Render and Export
Once you are satisfied with the motion tracking, effects, and overall video quality, it’s time to render and export the final result. Choose the desired output format and settings based on your requirements and the intended platform for the video. Consider factors such as file size, resolution, and compression settings to optimize the video for smooth playback and sharing. Start the rendering process and be prepared for it to take some time, especially for longer or more complex videos.
Conclusion
Motion tracking opens up a world of possibilities for video editing and visual effects. Following this step-by-step guide, you should have a solid foundation for applying motion tracking to specific objects in your videos. Remember to practice and experiment with different techniques to unleash your creativity and produce captivating videos that engage your audience.